Wooden Iphone Dock

EJS_7222-700x1048

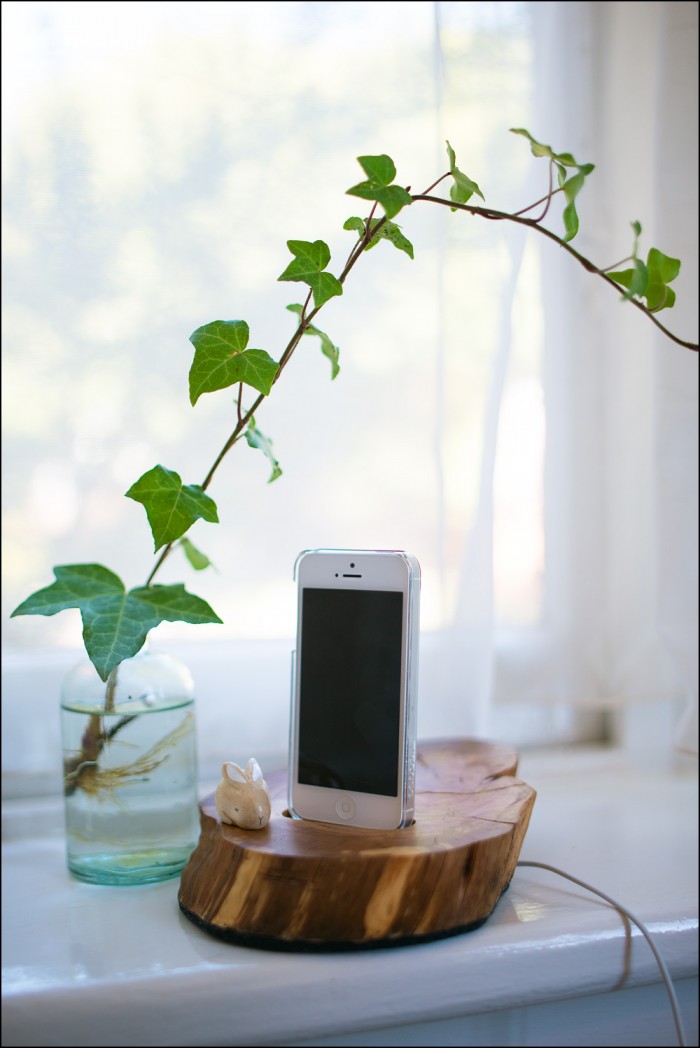
This iPhone stand charges your phone while adding a unique rustic touch to a space. It may take some time to create this but it will definitely be worth it!

Supplies needed includes..

  • piece of wood
  • lightning cable
  • sand paper
  • dremal or rotary hand tool
  • hot glue gun
  • drill
  • cabinet makers wax
  • thick, self adhesive felt base

Steps

  1. First make sure your wood is the thickness and size you want it to be (use a hand saw if needing to be cut)
  2. Sand down your piece of wood to the texture you prefer

wip1    
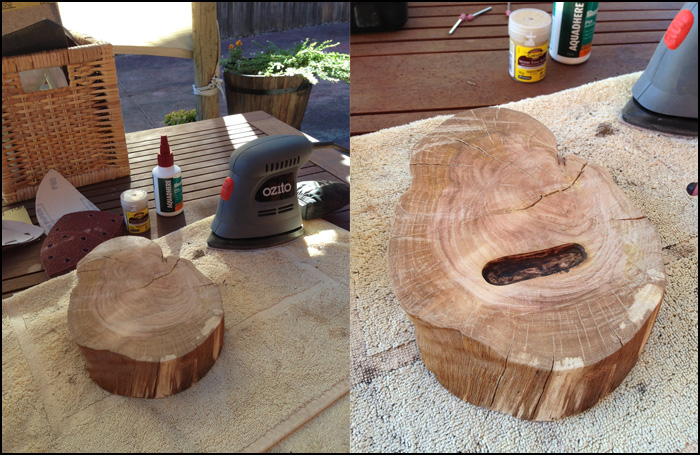
3. Use your rotary hand tool to carve out the recess for your phone

    4. With the cabinet maker wax, smooth the groove and buff the entire piece of wood

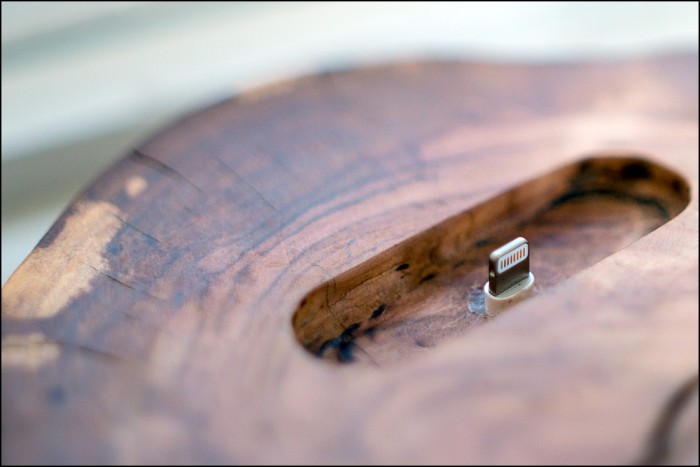
    5. Use the drill to create a hole in the center of the groove for your cord

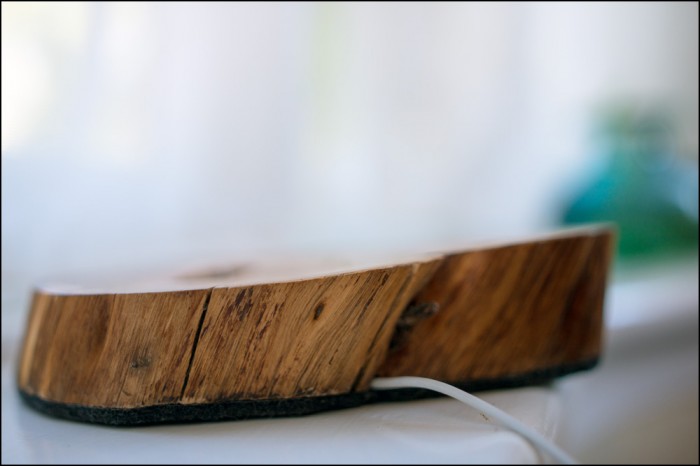
    6. The next step is to use the dremel to carve out a path for the rest of the cable on the underside of the dock (carve it deep so that the dock will sit perfectly flat)

EJS_7214-700x466    7. Add glue from the hot glue gun onto the charging cord before placing it into the hole

    8. Fill the remaining gaps in the hole with hot glue, and when it’s cool flip it over and do the same at the bottom

EJS_7204-700x467   9. Last step is to apply a layer of thick, self-adhesive wool felt on the base.  It’s designed to protect the surface that your dock will sit on, but also serves to hide messy cables and keep your dock perfectly flat

Quick summary of the steps

Carve a spot for your phone to sit in.  Smooth, polish or stain your wood to your heart’s content.  Drill a hole for the cable, and glue it in place so that it won’t budge.  Flatten the base somehow.

ENJOY!

Christmas Decorations

Since Halloween ended, stores wasted no time in getting prepared for Christmas. Starbucks brought out the red cups and is now even playing Christmas music in their coffee shops. Although I love everything that comes along with Christmas time, there is nothing that brings me into the spirit more than decorating my home. Since there are endless amounts of DIY Christmas crafts, here are a few links to lead you to the instructions for each project. Keep in mind that each link has multiple other crafts to try!

Happy Decorating!

Ornaments

No-Mess-Handmade-Glitter-Ornaments

http://martysmusings.net/2013/12/no-mess-handmade-glitter-ornaments.html

Luminaries and Lanterns

527af37d697ab05992004b11__w_540_s_fit_527af389697ab059b2004bfb__w_540_s_fit_

 http://www.apartmenttherapy.com/diy-christmas-crafts-homemade-holiday-luminaries-lanterns-196981

(this site has many more links for Christmas lanterns)

Tool Box Advent Calendar

toolbox advent calendar collage_thumb[2]

http://www.sassystyleredesign.com/2012/11/toolbox-advent-calendar-tutorial.html

Christmas Pillows

52af2a5ce1aac$!400x

http://www.stylemepretty.com/living/2013/12/19/diy-holiday-throw-pillows/

Canvas Wall Art

normal_90X90FIL_R-L

 Canvas wall art is a great way to display a word or words most meaningful to you. I tried this project last weekend and it turned out great! Spray paint it your favorite color, or add anything to it to make it your own!

Here’s what’s needed and how its done..

Supplies

  • art canvases (as many as you want)
  • wood letters (to create your words)
  • spray glue
  • spray paint (color of your choice)

Canvas+Wall+Art+002

 First, layout all your letters on the canvas to get the idea of placement. Nothing worse than to start gluing and realizing there’s not enough room!

Canvas+Wall+Art+004

 Second, spray the glue on the back of each letter and place it on the canvas.

Canvas+Wall+Art+005

Once the glue has dried, spray paint the entire canvas and letters with the color of your choice. It is probably best to spray two coats to make sure the color is even! Leave them to dry and then display them however you like!

Just remember that this project can be done in a variety of ways! Options for size, words, and color are all to be determined by you.

Have fun with it!

DIY Make-up Organizers

imagesPHLO9MGU

Is this how your make-up drawer looks? Does the amount of make-up you own exceed your storage space for it? If so, below I will show you how to organize and de-clutter all your make-up with some fun DIY projects!

Brush Holder

2376a05efa42d89932be7d593714874e

I currently use this exact way to hold my brushes and I have to say it works amazing! Not only does it take up a small amount of space, it also keeps your brushes clean. I wasn’t sure if the brushes would actually stand up straight but surprisingly they are held very sturdy!

Create your own brush display!

Container to hold your brushes – I prefer glass. The size and style are up to you… Bonus Tip: thrift and dollar stores have gorgeous glass jars and vases on the cheap!

River rocks or stones – I found my rocks at Bed Bath and Beyond, but I’ve seen them at Walmart and even the dollar store. I chose two clear varieties. You can find stones in a ton of cute styles and colors, be creative and really personalize your display!

Magnetic Makeup Board

This magnetic board is a simple and easy way to clear off your counter top!

94709_735471060_l

Supplies needed to make your board:

  • 16 x 24 inch frame
  • metal sheets
  • E-6000 industrial strength adhesive
  • magnet strips
  • scrapbook paper (optional)

Simple 3 step process!

  1. Frame your magnetic sheets
  2. At this point your can either leave it as a black surface or make it a bit more creative by gluing patterned scrapbook paper of your choice on top
  3. Add magnet strips to the back of all your makeup and anything else you plan on sticking to your board (the baskets in the picture can easily be stuck to the board)

START ORGANIZING YOUR MAKEUP NOW!

Carveless Pumpkin Decorating!

14 Decoupage Photo Pumpkin.

This photo pumpkin is such a great way to display your photos. By using a faux pumpkin, this decoration will last forever! When I did this project, I used photos from previous years on Halloween night. The photos went perfect with the theme! This project is very simple and fun to do.

Instructions:

  1. Print off your photos in black and white on regular paper
  2. Paint the back of each photo with mod pog and start sticking them on your pumpkin
  3. Once your pumpkin is covered in photos, leave it for an hour to dry and then paint a layer a mod pog over the whole thing
  4. After 2 hours paint another layer
  5. Repeat step 4 until you get the texture you like!
DecoupagePumpkin1

Faux Pumpkin & Mod Podge

DecoupagePumpkin2

Black and White Photos on Regular Paper

 Glitter Pumpkins.

31If your looking for a chic way to decorate your pumpkins this Halloween, this is such a great way to do it!

Here’s what you’ll need to know:

For the dots: dip the pouncer in some mod podge, stamp the pumpkin, glitter each of the dots after stamping

For the strips: brush on mod podge every second node, glitter as you go around

Use your paint brush to sweep away any excess glitter, seal and your done!

DSC_0473

Supplies- small white decorative pumpkins, mod podge, loose glitter (color of your choice), martha stewart foam pouncers, brush & spray sealer.

DIY Chalkboard Paint Mugs

Write messages to your family member while pouring them a cup of coffee in the morning! This simple chalkboard coffee mug is adorable :)

Write messages to your family members while pouring them a cup of coffee in the morning! This simple chalkboard coffee mug is adorable 🙂

I was so excited when I first heard of chalkboard paint. A simple and affordable way to create a writing surface on almost anything! These chalkboard mugs are perfect for everyday use! Here are the details:

Tape your mug in the places you don’t want to have any paint. The areas where you want to paint will need many coats! Once fully painted, take the tape off immediately. After your paint completely dries, bake your mug at 350 degrees for 30 minutes. After you bake it, the paint will be permanent! When the mug cools down, start drawing on it!

Chalkboard Mug Steps

MASON JAR MAGIC

Chalky painted mason jars! All you need are a few glass mason jars and matte finish paint! Second coat of paint will make the color more bold. Fill your jars with whatever you want! Flowers, kitchen tools, makeup brushes, etc!

Chalky painted mason jars are a funky way to decorate your home. With a few glass mason jars and matte finish paint, you can create this craft in just minutes! Paint at least two coats on your jar to get a solid color. Once the jars are dry, they can be used in many different ways!

Mason jars attached to a wood pallet can be incorporated into various places in your home! Supplies needed for this craft are mason jars, hose clamps, wood, screws, drill, and a picture hanging kit. Steps: 1. Use a drill bit to get a hole started in the wood, where you’ll eventually screw in the hose clamp. 2. Also use the drill to put a hole in the hose clamp 3. After you’ve created the hole in the wood and the hole in the hose clamp, line them up and drill the hose clamp into the wood. 4. Slip the mason into the clamps and tighten until secure. 5. To hang it up, nail two hangers on the backside of the wood. VOILA!

Mason jars attached to a wood pallet can be incorporated into various places in your home!
Supplies needed for this craft are mason jars, hose clamps, wood, screws, drill, and a picture hanging kit.
Steps:
1. Use a drill bit to get a hole started in the wood, where you’ll eventually screw in the hose clamp.
2. Also use the drill to put a hole in the hose clamp
3. After you’ve created the hole in the wood and the hole in the hose clamp, line them up and drill the hose clamp into the wood.
4. Slip the mason jar into the clamps and tighten until secure.
5. To hang it up, nail two hangers on the backside of the wood.
VOILA!

Mason jar projects have become a passion of mine, who knew that such a simple thing could be used in many different ways!

NEW WAY TO RECYCLE YOUR WINE BOTTLES!

Love fall?! Take a different approach and create some fun center pieces by spray painting your bottles!

Love fall?! Take a different approach and create some fun center pieces by spray painting your bottles! All you need is a few wine bottles and spray paint. Choose 2 or 3 colors to achieve an ombre look.

Put your own creative twist into decorating all those empty wine bottles from the past long weekend! With little supplies, these bottles can be transformed into amazing decorations for your home!

These bottles wrapped in yarn and decorated with buttons are a simple way to create customized, year round, decoration for your home. Choose a word most meaningful to you to write on your bottles! With just yarn, buttons, and tape, you can achieve this look.

Wrap your bottles in yarn and decorate however you want!

Here is a second way to decorate bottles wrapped in yarn. Choose what style you like best 🙂